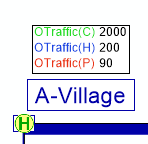
In the Network editor window, you can add freely configurable tables to network windows. In these tables, you can display several rows and two columns with attribute names and their values or a text (Fundamentals: Labeling with tables).

1. On the Graphics menu, click Edit graphic parameters.
The Edit graphic parameters window opens.
2. For line objects make sure, that in the <Network object type> tab the option Draw label has been selected.
3. Make sure that the table display has globally been enabled for the desired network object type and status:
- Point object: Navigator entry <Network object type> > Display > desired tab > option Draw table > is active.
- Line object: Navigator entry <Network object type> > Label > Display > option Draw table > is active.
|
Note: For classified display of a network object type, define by class whether tables are to be displayed. |
4. In the navigator, select the desired entry:
- Point object: Navigator entry <Network object type> > Table
- Line object: Navigator entry <Network object type> > Label > Table
5. Make the desired changes.

|
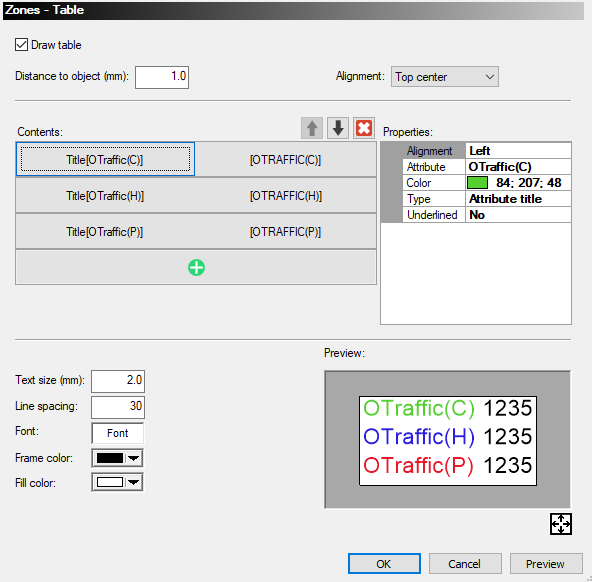
Element |
Description |
|
Draw table |
If the option has been selected, the links are labeled with tables. |
|
Distance to object |
Distance between table and network object in mm |
|
Alignment |
Use the drop-down menu to specify the alignment of the table to the network object. |
|
Contents |
Selection of the contents displayed in the tables You can select the elements displayed in tables by clicking the plus symbol The following contents can be added: Text You can adjust the text as you like if you double-click the row. Attribute value Select an attribute of the selected network object type whose value you want to display in the table. Attribute title Select an attribute of the selected network object type whose name you want to display in the table. Attribute title and attribute value Attribute name and value are displayed next to each other in one row. Free text and attribute value Select an attribute whose value you want to display in the table and enter a text of your choice, which will be displayed next to this value. Notes The selected Type can then be changed via the shortcut menu. In the network view, the various items of the tables are arranged like in the Contents section. A Preview in the lower area shows the selected contents. A click on the Use the arrow symbols to change the order of the items. You can change the selected attributes by double-clicking them. Use the |
|
Properties |
This displays the properties of contents currently selected on the left side. You can edit the properties right in the list. The properties displayed change depending on the selected content. Attribute Selected attribute Color Font color of the attribute or text Text Free text that can be edited directly in the Contents or Properties section Decimal places Number of decimal places for the display of the attribute value Note The field is only active when selecting numerical attributes with decimal places. Round to a multiple of Rounding value for the displayed attribute values Type Here you can edit the type of content. This is also possible via the shortcut menu of the entry in the Contents section. Underlined Specifies whether the attribute is to be underlined. |
|
Text size |
Text size in mm |
|
Line spacing |
Line distance in percent of the current text size |
|
Font |
In a separate window, you can specify a Font and a Style by clicking in the field. |
|
Frame color |
Use the drop-down list to select a color for the margin. For a display without a frame, select No frame. |
|
Fill color |
Use the drop-down list to select a color for the background of the table or make it Transparent. |
|
Note: Click the Preview button to immediately show your changes in the network display without closing the Edit graphic parameters window. |
6. Confirm with OK.
The network objects are displayed with the tables according to your chosen settings. With the mouse, you can drag the individual tables to new positions.
 .
. symbol adjusts the display to the preview area.
 symbol to remove currently selected items.
